How to crochet amigurumi for beginners
So you want to learn how to make amigurumi, but what exactly does that entail? This article will teach you everything you need to get started making your own amigurumi.
TABLE OF CONTENTS
What is amigurumi?
First things first, what is amigurumi? Amigurumi refers to the Japanese art of crochet plushies. Sometimes it refers to plushies made out of any yarn craft, like knitting, but the special thing about crochet amigurumi is that it can only be handmade. Yep that’s right – knit stuffed toys can be machine-made but if a softie is crocheted, you can rest assured that it’s been made by hand. This makes them all the more special when you give or receive one as a gift.


How is amigurumi made?
Amigurumi is usually crocheted in the round, which is the technique used to create – you guessed it – round things like hats and baskets. The only other way you can crochet is in rows, which is the technique used to create flat things like scarves and blankets. The way you start the pieces are different, but what you do afterwards is more or less the same.
I daresay that crocheting in the round is easier than crocheting in rows, since you literally do the same stitch over and over again! (This is why, by the way, The Woobles kits come with a pre-made magic loop – it gets the first round of your softie out of the way, so you can jump right into practicing the main crochet stitch.)


These are the most common stitches and techniques used to create amigurumi, using US terminology. Read more about US vs. UK/Australian terminology here.
The finishing touch that gives amigurumi its cuteness overload is its eyes. They’re most commonly made of plastic or glass, or embroidered on.

What supplies do I need for amigurumi?
- Pattern
- Yarn
- Hook
- Stitch markers
- Tapestry needle
- Stuffing
- Safety eyes (or yarn or embroidery thread)
- Scissors
- Pins (optional but recommended)
Read on to learn more about each supply.
Pattern
If you’re just starting out, you’ll definitely want to start with a pattern. A pattern is a set of written instructions that explains things like what types of and how many stitches you need to make, and where to attach pieces to each other. It tells you what materials you need to make this specific amigurumi – most importantly, the size and quantity of yarn, and what hook size. Patterns also typically come with skill levels to help you figure out ahead of time if you’re up to the challenge.

Crochet patterns come with skill levels
Here’s where I like to search for amigurumi patterns:
- AmigurumiPatterns.net – If you want all things amigurumi, Amigurumi Patterns has the best curated collection. They have both free and paid patterns, and even sell books! You can find The Woobles patterns here as well.
- Pinterest – When I’m looking for free patterns, I personally turn to Pinterest. The image-based search results make it super easy to pick out which designs jive with you.
- Etsy – For higher quality patterns, consider paying for them. What makes for a higher quality pattern? They tend to be cuter, more creative, and more carefully written. I like Etsy for paid patterns because Etsy has a great selection of high-quality independent designers across lots of different crafts, not just crochet. You can purchase The Woobles patterns and beginner kits on Etsy too.
- LoveCrochet – This is a big repository of free and paid patterns, conveniently categorized into a crochet-specific site. These folks also produce on of the best yarns for amigurumi, Paintbox Yarns.
- Ravelry – A mainstay of the knitting and crochet community. Its main benefit is the huge community – there are forums for literally every and any interest when it comes to yarn crafts.
- The Woobles – If you like the pictures in this post, you can buy kits for them directly from this site. For complete beginners, I highly recommend the kits because they come with 1) a quick start video that starts all the way from the basics of holding a hook and yarn, and 2) the first round already made, so you can focus on practicing the main crochet stitch.
Yarn
What’s a yarn craft without yarn? The best yarn to make amigurumi with is either 100% acrylic or mercerized cotton. For beginners, I’d recommend acrylic yarn – it’s cheaper and usually bigger than mercerized cotton yarn, which will make it easier for you to develop that muscle memory and feel more comfortable about inevitably making mistakes. These materials are better for amigurumi because they hold their shape well over time, and don’t get too fuzzy.
Here’s an example of amigurumi made with acrylic yarn:


And an example of amigurumi made with cotton yarn:


As for size, your pattern will tell you what size you need. The most common size yarn used for amigurumi are aran-weight yarn and sport-weight yarn. Here’s a table the helps map the symbols on a yarn label to the weight.
Hook
When you buy a skein (that oblong pile that yarn usually comes in the shape of) of yarn, it has some symbols on the label that tell you the recommended hook size to use with this yarn.
Don’t listen to it.
That’s right, you rebel you. For amigurumi, you need to crochet tighter than the norm for 2 reasons:
- Prevent the stuffing from being seen between the stitches
- Help the softie maintain its shape
Usually amigurumi patterns call for hook sizes between 1.5mm to 4mm. While the hook size in the pattern is a good starting point, everyone crochets at different default tensions, so don’t be afraid to size your hook up or down based on your personal style. The goal is to pick a hook that’s small enough so that when you crochet a bunch of single crochets, the resulting fabric doesn’t have a hole in it.

Stitch markers
I cannot stress enough how important stitch markers are for amigurumi. Some amigurumi are made with joined rounds, but most amigurumi are made in continuous rounds. This means that if you’ve done things right, you won’t be able to tell where one round starts and another one ends.
Look ma, no seams!


The upside? You make a beautiful, professional-looking plushie.
The downside? You can’t figure out what to do when you inevitably lose count of your stitches or make a mistake.
Enter stitch markers to save the day! If you put one in the first stitch of each round, if you ever lose track of your place, you only have to backtrack as far as the stitch marker.
Stitch markers come in many different designs. I highly recommend getting the lockable type of stitch marker (the ones that look like little baby diaper clips), since you’re guaranteed that they’ll stay on your piece, no matter what.


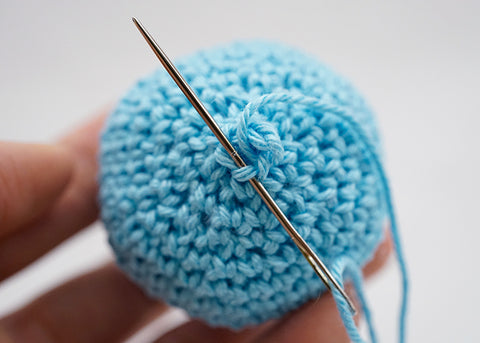
Tapestry needle
Or really, any needle that has a blunt tip and a big ol’ eye. Once you’re done with a crochet piece, you’ll need to hide the extra bits of yarn at the very beginning and end of your piece. You’ll also need to sew the pieces together with yarn. As you can imagine, it would be near impossible to thread yarn through a traditional needle, so save yourself the frustration and get a bigger needle.

Stuffing
A lot of people guess that amigurumi is stuffed with yarn but surprise! It’s usually stuffed with a material called fiberfill. The most common brand of fiberfill is called Poly-fil. The main benefit of using fiberfill instead of yarn ends and other miscellany soft-ish things, is that it makes your amigurumi look smooth and feel satisfyingly squishy. And if there’s one thing I’ve learned from doing craft fairs, it’s that people loooove squishing amigurumi. Of course the devil is in the details, so read more about the technique to stuff amigurumi here.
Safety eyes
Eyes – the final touch to the cuteness overload that is amigurumi. Safety eyes come in all different sizes, measured in millimeters, and in all sorts of colors. Most patterns use black plastic safety eyes, but there are more life-like ones that come with different colors and different materials, like glass.


Scissors
You’ll need scissors to cut your yarn. Any scissors will do!
Pro tip: When I’m traveling and can’t bring scissors on a plane, I use nail clippers instead.
Pins (optional)

I’m ready to amigurumi! What’s next?
Buy a beginner kit, or check out some of The Woobles free patterns. All kits come pre-started, so you can hop right into working on your main crochet stitch. They also come with a special quick start video that shows you the basics of how to hold your hook and yarn, all the way to helping you make it through your first few stitches.
If you want to stay up-to-date about my latest patterns, kits, and sales, then sign up for my newsletter at the bottom of this page👇
If you have any questions about amigurumi, even if it isn’t Woobles-related, you can always reach out to me at hello@thewoobles.com.

Hi Christy, happy to help! This article has some free patterns that might help: https://thewoobles.com/blogs/news/free-amigurumi-patterns-for-crocheters-of-all-skill-levels
Would love to get any of the free patterns to enhance my learning process.
I like the turtle is that going to be a woobie also.I hope so he’s cute